
1.Getting Started
Thank you for using this theme. If this instruction doesn’t cover your queries feel free to contact us and we will do what we can. We have tried our best to keep it as simple as possible. If you think it can be made even simpler let us know we will be glad to change it.
1.1.How to Install Theme
Envo Store free
Download the theme from our homepage.
Envo Store PRO
Login to your account on our website and download the theme from “Downloads” tab.
Upload via WordPress Admin
- Download Theme zip,
- Go to Appearance >Themes,
- In Install Theme tab, choose “Upload”,
- Then find theme-name.zip file on your computer and press Install Now,
- Go to Appearance -> Themes panel, locate the theme and click Activate button to activate the theme.
Install via FTP
- Unzip the downloaded file,
- Upload theme folder into Themes folder in your WordPress installation (/wp-content/themes) via FTP,
- Go to Appearance >Themes, find theme and activate it,
1.2.Migrating From Another Theme
If you are migration from a theme which used the native featured images functionality of WordPress. Please use the Regenerate Thumbnails plugin to resize all the thumbnails. Click the link above and download the free plugin, and read through the steps it contains, it has all the information you need.
1.3.Recommended Plugins
WooCommerce
WooCommerce is a powerful, extendable eCommerce plugin that helps you sell anything. Beautifully.
This plugin is required for Shop features. Download HERE.
Ajax Search for WooCommerce (PRO version only)
The plugin allows you to display the WooCommerce AJAX search form anywhere on the page.
Download HERE.
Crelly Slider (PRO version only)
Crelly Slider is a Free responsive WordPress slider that supports layers. You can add Texts, Images, YouTube/Vimeo videos using a powerful Drag & Drop Builder and animate each of them.
Download HERE.
1.4.Activating PRO license
License key is required for the PRO version. Login to your account – Orders and hit “License Manage” button.
Use the key generator at the bottom to generate the key(s). You can activate/deactivate the keys or delete them.
Copy one of your key and go to your website WP dashboard – Settings – Envo Store PRO and paste your key here.
2.Homepage Setup
Install The WooCommerce plugin first.
Create your new page and give it a name, e.g : Home and Set the page template to Homepage Template.
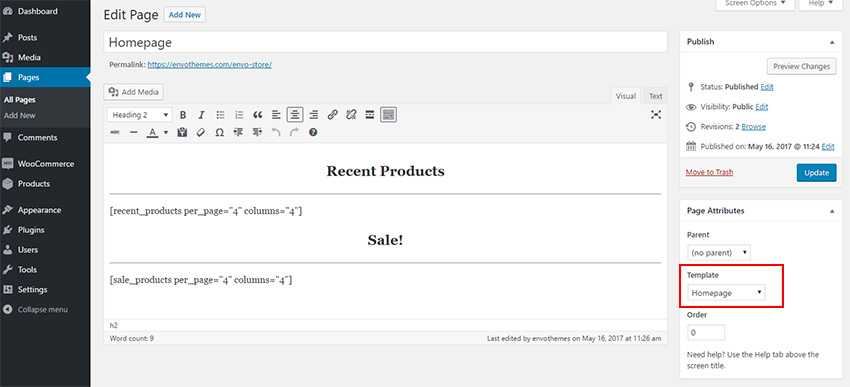
2. Go to Reading -> Settings and change your front page to the Home page you recent created above.

2.1.Front Page Section
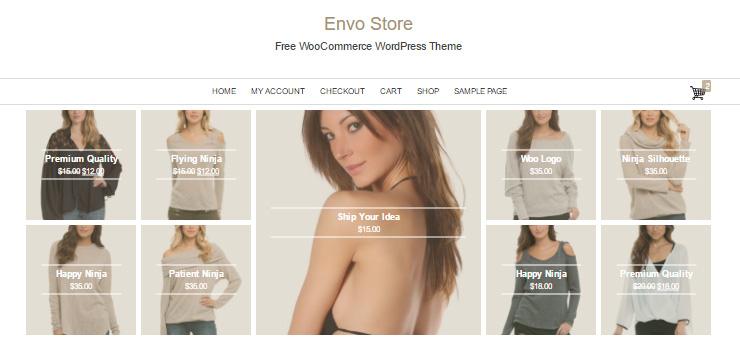
Theme displays 9 of your featured products on your homepage template. To display this section you must mark 9 of your producst as featured.
How to mark a product as Featured: https://docs.woocommerce.com/document/managing-products/#section-20
Note: The minimum images width and height is 460x460px. If the pictures are disordered, make sure that the images are at least 460x460px big or bigger. To update old images, WordPress needs to regenerate the thumbnails. A great plugin that does just that is Regenerate Thumbnails.
You can disable this section with this CSS code:
.top-grid-products {
 display: none;
}2.2.Front Page Content
Use WooCommerce shortcodes (https://docs.woocommerce.com/document/woocommerce-shortcodes/) to add list of your products and categories…
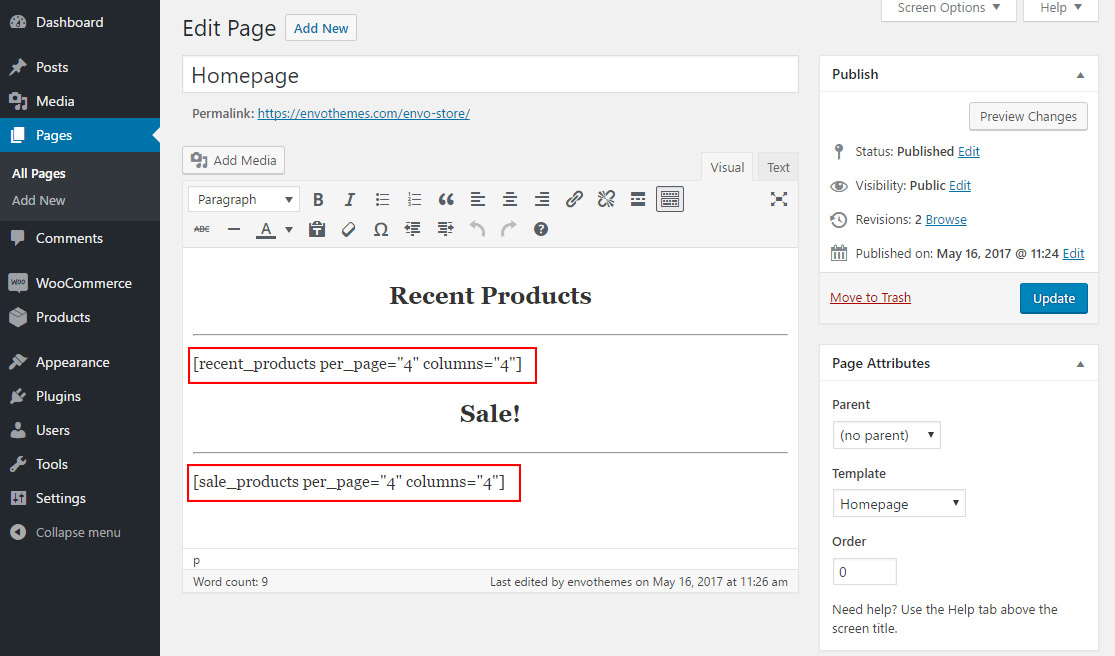
You can install WooCommerce Shortcodes plugin that will help you add the shortcodes inside the content. This plugin provides a TinyMCE dropdown button for you use all WooCommerce shortcodes.
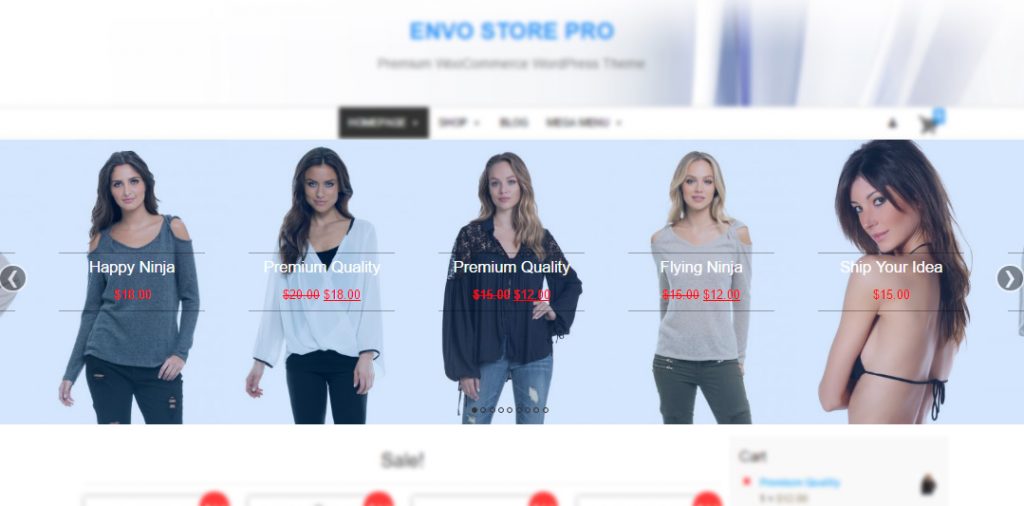
2.3.Front Page With Slider (PRO version only)
Our PRO version provide integration for Crelly Slider. (demo: https://envothemes.com/demo-envo-store-pro/)
- Install and activate free Crelly Slider plugin.
- Go to your WP dashboard – Crelly Slider and create your slider
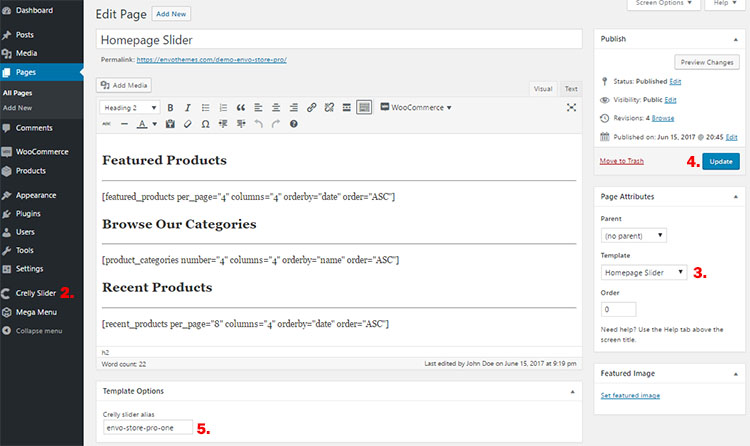
- Create new page and select page template “Homepage Slider”
- Save the page
- Put the slider Alias into the page template slider filed
The Crelly Slider documentation: http://crellyslider.altervista.org/documentation/
You can import our demo slider. Login to your account on our webiste and download the Crelly slider zip file.
2.4.Front Page Carousel (PRO version only)
This section displays 10 of your featured products on your homepage template. To display this section you must mark 10 of your producst as featured.
How to mark a product as Featured: https://docs.woocommerce.com/document/managing-products/#section-20
Note: The images width and height is based on WooCommerce setting – https://envothemes.com/documentation/#woocommerce-images
To enable this section create new page and set the page template as “Homepage Carousel”
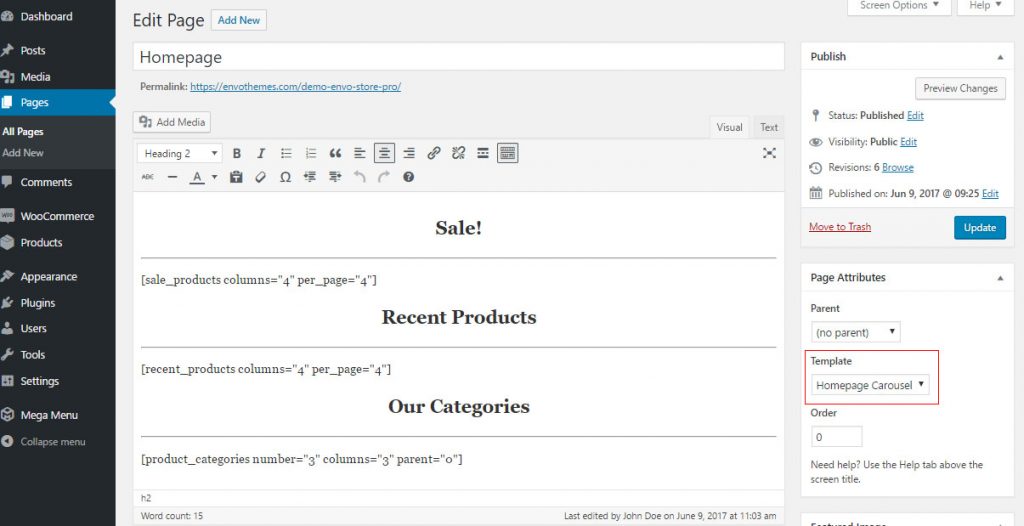
If you want set this page as your homepage Go to Reading -> Settings and change your front page to the Home page you recent created above.
3.Main Menu Widget Area (PRO version only)

Envo Store PRO includes widget area under main menu. This area is divided to 3 columns per row. Go to Appearance – Widgets and drag and drop widget to the “Menu Section” area.
Theme demo layout
First widget – text widget with text:
CUSTOMER SUPPORT
<b>CALL US +800 756 167</b>
Second widget – Ajax Search for WooCommerce widget
Third widget – text widget with shortcodes:
<span style="float: right;"><strong>Follow Us: </strong>[es-icon url="#" icon="fa fa-facebook"][es-icon url="#" icon="fa fa-google"][es-icon url="#" icon="fa fa-twitter"]</span>
Theme includes shortcodes for the social icons. Put your URL and replace icon with your social icon (eg. google: fa fa-google, twitter: fa fa-twitter). You can find all available icon codes here: http://fontawesome.io/icons/
[es-icon url="#" icon="fa fa-facebook"]
4.Theme Options
All available options can be used from Appearance->Customize
Envo Store free:
To setup the Logo, Site Title and Tagline or Site Icon go to Customizer – Site Identity
To setup the Header text Colors and Background Colors go to Customizer – Colors
Envo Store PRO theme setup options:
5.Lazy Load Images (PRO version only)
Envo Store PRO includes lazy load for WooCommerce product/category archive images, homepage sections, blog archive pages and post/page featured image.
Lazy Load is delays loading of images in long web pages. Images outside of viewport are not loaded until user scrolls to them. Using Lazy Load on long web pages will make the page load faster. In some cases it can also help to reduce server load.
You can check this feature on our demo page: https://envothemes.com/demo-envo-store-pro/
6.1 Click demo import (PRO version only)
Envo Store PRO includes One Click Demo Import. This import our demo content (with images), widgets and theme settings with one click (plugins settings are not included).
- Install and activate WooCommerce – this plugin is required for the import
- Install and activate plugin: One Click Demo Import
- Go to WP Dashboard -> Appearance -> Import Demo Data
- Hit the “Import Demo Data” button
- Wait till the plugin import all data

After the import setup the plugins (WooCommerce). We recommended setup the WooCommerce pages (if you didn’t do it sooner). Go to WP Dashboard – WooCommerce – System status – Tools and hit the button “Install Pages”.
7.Mega Menu (PRO version only)
Envo Store PRO supports free Max Mega Menu plugin.
Install and activate this plugin.
Go to Appearance – Menus – and enable Max Mega Menu (1.) in your main menu and select the theme “Envo Store PRO” (2.). Save your setting and hit “Mega Menu” (3.) on the menu item to setup your menu (mega menu).
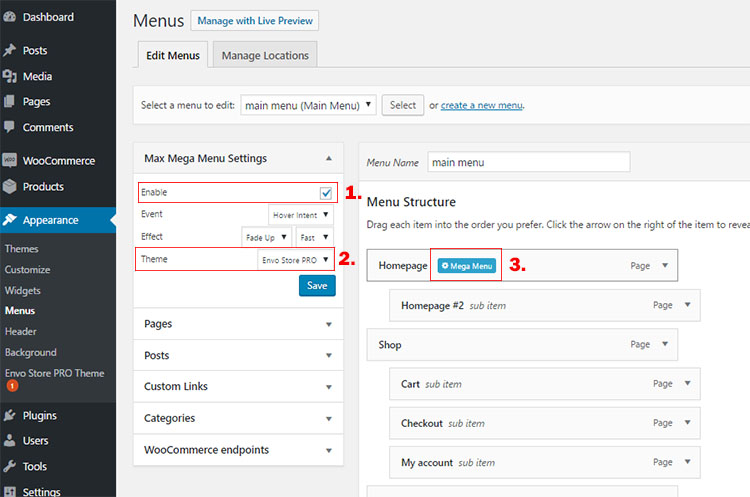
Follow the Max Mega Menu documentation – https://www.maxmegamenu.com/documentation/getting-started/installation/
8.WooCommerce Images
All WooCommerce images are controlled by WooCommerce.
The documentation: https://docs.woocommerce.com/document/adding-product-images-and-galleries/
Set products image dimensions: https://docs.woocommerce.com/document/adding-product-images-and-galleries/#section-6
Fixing Blurry Product Images: https://docs.woocommerce.com/document/fixing-blurry-product-images/