Envo Business Documentation

1.Getting Started
Thank you for using this theme. If this instruction doesn’t cover your queries feel free to contact us and we will do what we can. We have tried our best to keep it as simple as possible. If you think it can be made even simpler let us know we will be glad to change it.
1.1.How to Install Theme
Upload via WordPress Admin
- Download Theme zip,
- Go to Appearance >Themes,
- In Install Theme tab, choose “Upload”,
- Then find theme-name.zip file on your computer and press Install Now,
- Go to Appearance -> Themes panel, locate the theme and click Activate button to activate the theme.
Install via FTP
- Unzip the downloaded file,
- Upload theme folder into Themes folder in your WordPress installation (/wp-content/themes) via FTP,
- Go to Appearance >Themes, find theme and activate it,
1.2.Migrating From Another Theme
1.3.Recommended Plugins
KingComposer
KingComposer is the fastest page builder ever. It’s real-time and instant process. Download HERE.Envo Business Demo Import
Import the free KingComposer demo layouts in one click. Download HERE.WooCommerce
WooCommerce is a powerful, extendable eCommerce plugin that helps you sell anything. Beautifully. This plugin is required for Shop features. Download HERE.2.Theme Setup
All available options can be used from Appearance->Customize
2.1.Homepage Setup
Install The KingComposer plugin first – https://wordpress.org/plugins/kingcomposer/
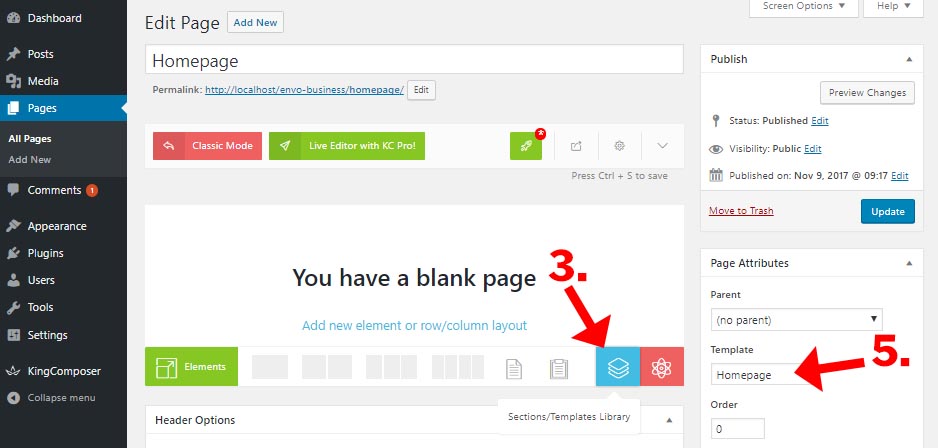
Create your new page and give it a name, e.g : Home and Set the page template (under “Page Attributes” – higlighted in red) to Homepage Template.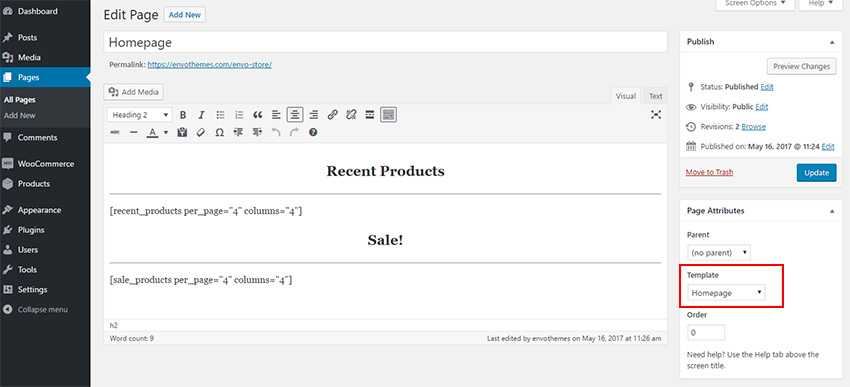 2. Go to Reading -> Settings and change your front page to the Home page you recent created above.
2.2.Menu Options
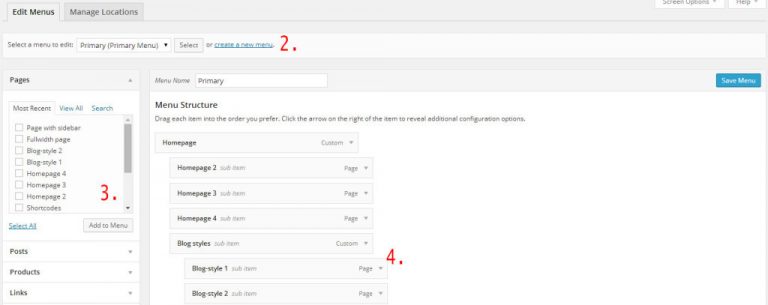
- Create a new menu by adding a “Menu Name” and save the menu (2.).
- Proceed by adding Pages, Categories and Custom Links to the new menu (3.).
- Organize your menu by dragging and dropping the links to your desired locations (4.).
- Set the menu location under the menu area
- Make sure to save your changes when you are done.
2.3.Transparent Header/Menu
- Create or edit the page
- Set the page template (under Page Attributes) – Homepage
- Save the page
- Scroll down under the content editor area
- Enable the transparent header in the “Header Options” tab
- Set the font color for the header
- Save your page
2.4.Colors & Typography
2.5.Mega Menu
With our Envo Business Mega Menu plugin you can get support of free Max Mega Menu plugin.
Main menu is supported with the the Mega Menu only.
The plugin adds 2 new menu locations (top and footer) and converts social links into the icons.
To Enable Menga Menu:
- Install and activate the Envo Business Mega Menu plugin
- Install and activate the Max Mega Menu plugin
- Now go to Appearance – Menus and enable the Mega Menu
- From this point you can create your own mega menus
To setup the colors, design and layouts of Mega Menu go to Mega Menu – Menu Themes and select “Theme to edit” – “Envo Business” (Important note: Keep the “Menu background” transparent)
For detailed Mega Menu documentation, visit the Max Mega Menu documentation page https://www.maxmegamenu.com/documentation/getting-started/installation/
The plugin adds Top Menu (located above main menu) with 2 menu locations
The plugin adds Footer Menu (located before footer credits)

To setup the top menu and footer menu, go to Appearance – Menus, create your custom menus and assign them to the correct menu location on the bottom (How to create menu)
Create social icon menu
The plugin automatically replaces links to popular social networks with icon equivalents.
Use “Custom link”, add the social page link and set the title. It should look similar to this:
- dribbble
- Flickr
- Foursquare
- Google Plus
- Tumblr
- Vimeo
- WordPress.com
- WordPress.org
- YouTube
- Twitch
- Any mailto: link
- RSS feeds
- Search (put #search into the URL field)
Note: Links are converted automatically in all menu locations. However, if you have the Mega Menu enabled, the icons will not be displayed.
You can edit the menu colors and fonts with our Envo Business Colors & Typography plugin
2.6.Footer Credits
You can edit Envo Business footer credits (Copyright) with our Envo Business Copyright plugin
Install and activate the plugin and go to Customizer – Copyright
You can use simple text or HTML code.
2.7.Lazy Load Images
With our plugin Envo Business Lazy Load Images you can save bandwidth and drastically improve page loading time and user experience.
Site speed is one of the factors that determine whether you get a good ranking in Google!
Envo Business Lazy Load Images plugin decreasing page load time by progressive loading of images (Important: Background images are not affected!). They will load just when reach visible part of screen.
The plugin is compatible with WooCommerce, KingComposer, Elementor, Jetpack plugin and all theme and WP generated images. All plugins that generates standard img tag will work too.
There is no plugin setup. Install it and activate it. The plugin works automatically.
Note: If your site is cached, clear the cache please after the plugin activation.
3.KingComposer Page Builder
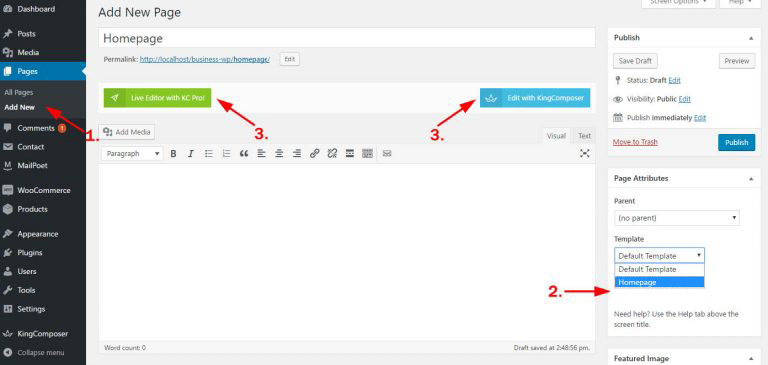
- Create new page – Pages – Add New
- Set the page template “Homepage”! (Important step) And save the page.
- Hit the “Edit with KingComposer” button or “Live Editor with KC PRO!” (if you have activated 7 days trial)
 Hit the Elements button (1.) to add some element directly or put the row/columns (2.) in the content and add the element (3.)
 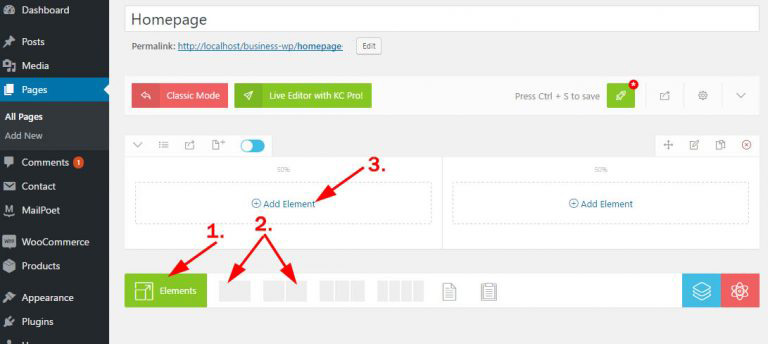 You can import our free demo layouts, check this documentation page https://envothemes.com/envo-business/theme-documentation/#importing-the-sample-data/
3.1.Importing The Demo Layouts
You can import the free KingComposer demo layouts in one click with the free extension EnvoThemes Demo Importer for KingComposer plugin. There are two ways.
Importing all layouts with one click:
Install and activate free extension EnvoThemes Demo Importer for KingComposer plugin
Now Go to WP Dashboard – Appearance – Envo Themes Demo import (or WP Dashboard – Appearance – Envo Business Theme – One Click Demo Import), check the notes and hit button “Import Data”. This Will import all 7 KingComposer demo layouts.Importing layouts one by one with King Composer plugin
Important! Our demo templates uses custom Google Fonts. If you want import demo layouts same like you see in our demo pages, go to WP Dashboard – KingComposer – Fonts using. Click on “Open Fonts Manager” and find & import these fonts: Oswald, Russon One, Indie Flower. You must do it before the import.- First, make sure that KingComposer plugin is activated.
- Then, install and activate the EnvoThemes Demo Importer for KingComposer plugin.
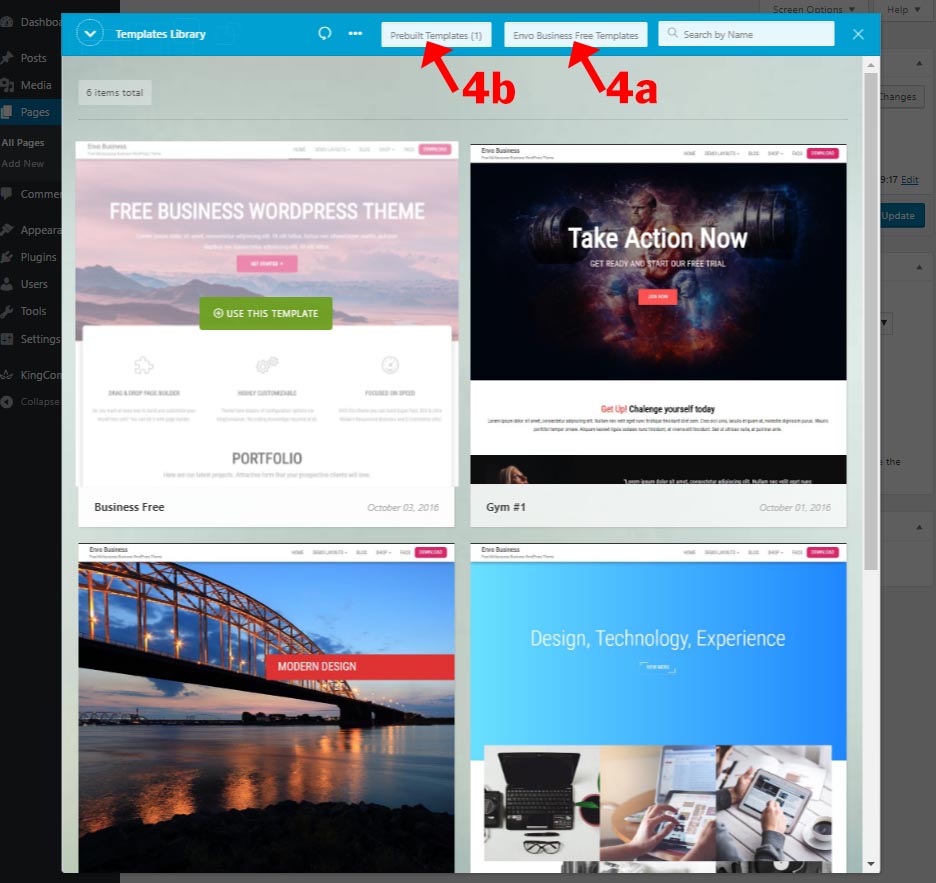
- Create or edit the page with KingComposer and hit “Sections/Templates Library” – To avoid wrong layout import, import the layout on backend editor (not on frontend live editor – KC PRO)
- Select Package – “Envo Business Free Templates” (4a) and “Prebuilt Templates (1)” (4b) and import the layout
- Don’t forget set the “Homepage” template layout.
 This will import the page layouts without images. The images are displayed, but they are located on our server. Replace them with your own. All images used in our demos are licensed under CC0 license – free to download and use. You can download and use all images used in our demos. You can visit https://pixabay.com/ for more free images.
3.2.KingComposer PRO Support
- Install and activate the Envo Business KingComposer PRO Suport plugin plugin.
- Install and activate KingComposer plugin
- Go to WP Dashboard – KingComposer and hit tab KC Pro!
- Hit button “Install KC Pro! Automatically” and wait
- The license is loaded automatically. Now you can use the KC Pro! live pagebuilder
4.Elementor Page Builder
Theme supports Elementor Page Builder plugin. Install and activate the free Elementor Page Builder.
4.1.Getting Started With Elementor Page Builder
- Set the page title
- Set the page template “Homepage”! (important step) And save the page.
- Click on the ‘Edit with Elementor’ button
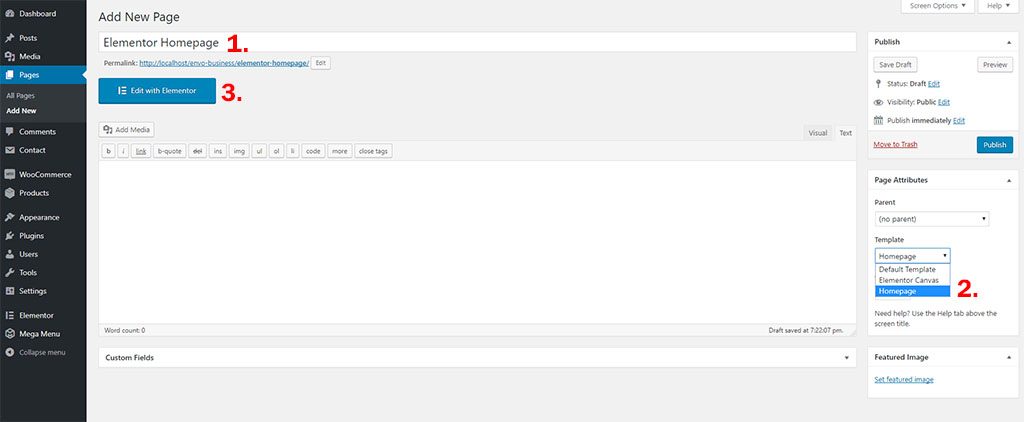 Now you can create your own unique design with drag and drop page builder. Check the Elementor documentation if you need help with the plugin settings or usage: https://docs.elementor.com/
4.2.Importing Elementor Demo Layouts
Click on the ‘Add template’ button to launch the Template Library and insert one of the Elementor pre-designed templates.
 Hover the template you want import and hit “Insert” button (PRO templates are included in the Elementor PRO only). This will import whole template design (with images).
4.3.Elementor PRO
Elementor Pro is an extension of Elementor and theme supports it too. It includes lot of new sections, features and another 30+ demos. We can not include the Elementor PRO in the theme. If you are interesting about the Elementor PRO you can check the individual pricing HERE
5.WooCommerce
Envo Business supports WooCommerce plugin. Install and activate the WooCommerce plugin from WP.org repository: https://wordpress.org/plugins/woocommerce/
To setup the plugin go to WP Dashboard – WooCommerce – Settings
5.1.Envo Business WooCommerce PRO addon
Envo Business includes basic WooCommerce support. With our plugin Envo Business WooCommerce Suport plugin you will get full WooCommerce support with product customizer (colors, typography, layouts), floating cart and account, gallery zoom, lightbox, slider and new KingComposer sections.
Install and activate the Envo Business WooCommerce Suport plugin and go to Customizer – WooCommerce
WooCommerce tab
You can enable breadcrumbs on WooCommerce pages
You can enable or disable Gallery Zoom, Lightbox and Slider on product pages
You can change number of items and items per row on shop/archive pages
WooCommerce Archive/Shop tab
In this tab you can controll the colors, typography and layout of products on Shop/Archive pages
WooCommerce Product Page tab
In this tab you can controll the colors and typography on single product page
WooCommerce Buttons tab
You can edit the buttons layout on single product page, cart and checkout (Product buttons on Shop/Archive pages are controlled under WooCommerce Archive/Shop tab)
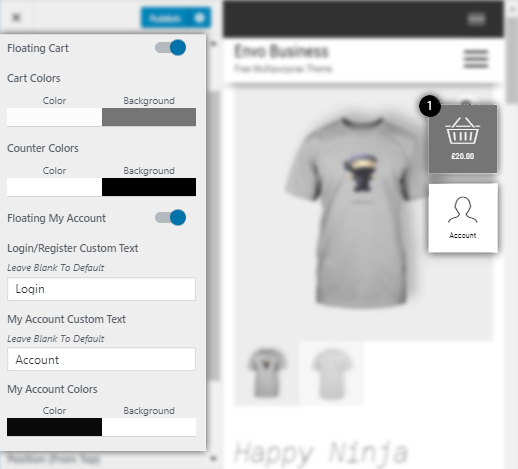
WooCommerce Cart/Account tab
You can enable or disable floating cart and account button and set the colors.
5.2.KingComposer & WooCommerce
To display products and categories in the pages with KingComposer use the “Raw Code” element and WooCommerce shortcodes.
1. Hit “Add Element” and select “Raw Code”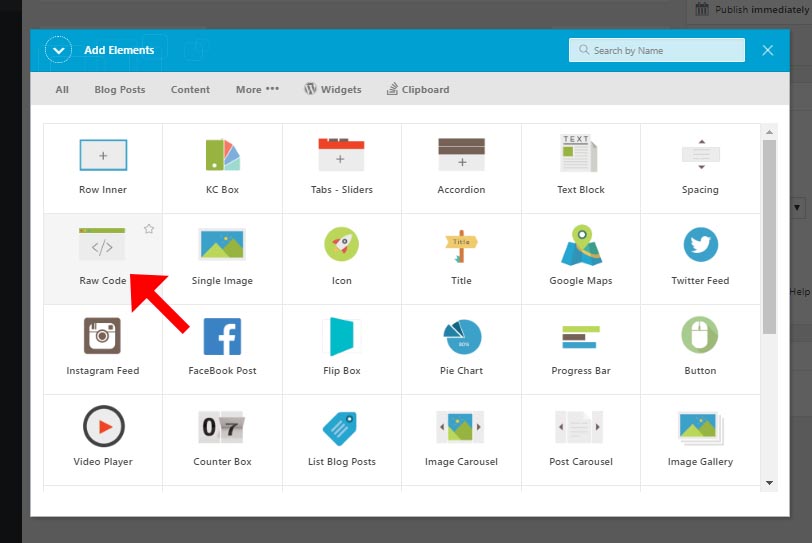 2. Paste the WooCommerce shortcode to display the products/categories You can find all available WooCommerce Shortcodes in WooCommerce documentation
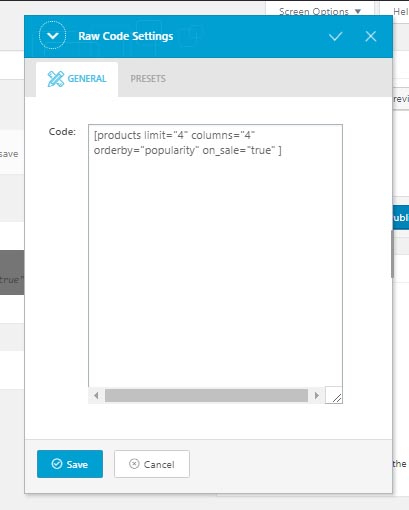
5.3.WooCommerce Images
All WooCommerce images are controlled by WooCommerce.
The documentation: https://docs.woocommerce.com/document/adding-product-images-and-galleries/
Set products image dimensions: https://docs.woocommerce.com/document/adding-product-images-and-galleries/#section-6
Fixing Blurry Product Images: https://docs.woocommerce.com/document/fixing-blurry-product-images/
5.4.WooCommerce Demo (dummy) Data
Right after installing WooCommerce you may find you have an empty store. There are no products, orders, reviews, and more by default. But perhaps you’d like to see what sample orders and products look like.
Check this WooCommerce tutorial, how to import dummy data: https://docs.woocommerce.com/document/importing-woocommerce-dummy-data/
5.5.WooCommerce Shortcodes
WooCommerce comes with several shortcodes that can be used to insert content inside posts and pages. These shortcodes works very vell with KingComposer Page Builder.
Check this tutorial, how to “call” the products, categories, etc. with the shortcodes: https://docs.woocommerce.com/document/woocommerce-shortcodes/
6.Installing plugin
In order to utilize any of our Envo Business Extensions, you’ll need to first install and activate them. The process is just like installing a normal plugin.
You can find the download link in the order confirmation email or you can download the purchased plugin from download tab on your account on our website.
In your WordPress dashboard, go to Plugins > Add New. From there you’ll see an option for Upload. Click the Browse button, navigate your computer files and select the .ZIP file for your downloaded extension. Once it’s uploaded, click the Activate link.