
1.Getting Started
Thank you for using this theme. If this instruction doesn’t cover your queries feel free to contact us and we will do what we can. We have tried our best to keep it as simple as possible. If you think it can be made even simpler let us know we will be glad to change it.
Help Us
We will really appreciate if you could help us by rating our theme in WordPress repository HERE
1.1.How to Install Theme
Installing Theme via WordPress interface
- Go to Dashboard > Appearance > Themes
- Click on Add New
- Search for the Envo Blog Theme.
- Click on Install and activate the theme
Installing Theme Offline
- Download a Copy of Envo Blog Theme from WordPress or our site.
- You’ll get ‘envo-blog.zip’ file save it in your storage.
- Go to Dashboard > Themes > Click on Add New
- Click on Upload Theme button.
- Browse for the theme you’ve have downloaded.
- Click on Install and Activate the theme.
Installation Via FTP/Cpanel
- Download a Copy of Envo Blog Theme from WordPress or our site.
- Now Connect the FTP server using the FTP details and copy the extracted folder to ‘site-name/wp-content/themes/’ path.
- Now, go to the Dashboard >> Appearance > Themes.
- You will see the Envo Blog theme in the theme dashboard.
- Activate the Envo Blog theme.
- Click on Dashboard >> Appearance >> customize for further setup.
1.2.Installing Plugin
In order to use Envo Blog PRO plugin, you’ll need to first install and activate them. The process is just like installing a normal plugin.
You can find the download link in the order confirmation email or you can download the purchased plugin (zip file) from download tab on your account on our website.
Do not unzip the .zip file!!!
In your WordPress dashboard, go to Plugins > Add New. From there you’ll see an option for Upload. Click the Browse button, navigate your computer files and select the .ZIP file for your downloaded extension. Once it’s uploaded, click the Activate link.
1.2.1.Plugin Install Failed
Receiving this error?:
The package could not be installed. The theme is missing the style.css stylesheet.
You’re most likely trying to install the plugin as a theme.
Head to your account and download your add-on file, then install it as a plugin.
1.2.2.No .zip file
You are using MAC probably with Safari browser that unzip the file by default.
Do the following so your zip files don’t open automatically after you download them:
1) Go into Safari Preferences.
2) Page titled General.
3) Scroll down to the bottom.
4) Deselect the box with the text “Open safe files after downloading”.
5) The plug-ins will now download as a .zip file which uploads
seamlessly to WordPress.
Or use another broswer/PC
Or use FTP method
1.3.Updating Plugin
First thing first. Create a backup of your entire website before updating the core, themes or plugins so that you could revert the changes if anything odd occurs.
Download the purchased plugin from download tab on your account on our website.
Via FTP
- Unpack the zip file that you downloaded.
- Using FTP or your shell access, upload the new
envo-blog-profolder into /wp-content/plugins/directory and replace all files.
Via WP Dashboard
- Go to WP dashboard – Plugins
- Deactivate and dlete Envo Blog PRO plugin
- Hit “Add New” and then “Upload Plugin” button in left-top corner and upload the new plugin zip file
- Activate the plugin
All plugin options are stored in database. By deactivating and deleting, you will not lose the plugin options. But the backup is strongly recommended for unexpected problems.
2.General Settings
Configure site logo/title/favicon
- Go to Dashboard >> Appearance >> Customize >> Site Identity.
- Click on Select Logo for upload or change site logo from existing logo. ( preferred size for logo is 300×50 ).
- Enter Site Title and Tagline.
- Check box option about site title and tagline display.
- Click on Select Image for upload favicon.
- Then, click on Save & Publish button.
Configure Background Color
- Go to Dashboard >> Appearance >> Customize >> Colors.
- Choose the color for site background from Background Color color picker option.
- Then, click on Save & Publish button.
Configure Background Image
- Go to Dashboard >> Appearance >> Customize >> Background Image.
- Click on Select Image button.
- Upload or choose an image for website background. Once select image then visible many settings about background image.
- Then, click on Save & Publish button.
2.1.Menu Settings
To setup the menu go to WP Dashboard – Appearance – Menus.
You can visit WP.org tutorial for more detailed instructions – https://codex.wordpress.org/WordPress_Menu_User_Guide
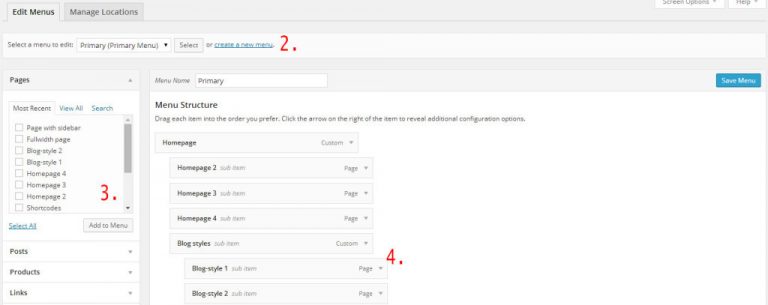
- Create a new menu by adding a “Menu Name” and save the menu (2.).
- Proceed by adding Pages, Categories and Custom Links to the new menu (3.).
- Organize your menu by dragging and dropping the links to your desired locations (4.).
- Set the menu location under the menu area
- Make sure to save your changes when you are done.
2.2.Footer Credits/Copyright (PRO)
You can edit footer credits (Copyright) info with our Envo Blog PRO plugin
Install and activate the plugin and go to Customizer – Copyright
You can use simple text or HTML code.
2.3.Advertisement spaces
ou can put Ad banners/texts into header Ad area or into any widget area.
With Envo Blog PRO you can display advertisement before and after post/page content, sliding ad or ad after main menu. To setup the Ad code go to Customizer – Ad spaces.
For more informations go HERE
2.4.Colors & Typography (PRO)
You can edit all colors and set the font (600+ google fonts) for most elements in Envo Magazine theme with our Envo Blog PRO plugin.
Install and activate the plugin and go to Customizer – Colors and Typography
You can controll the theme colors and typography.
2.5.Content Width (PRO)
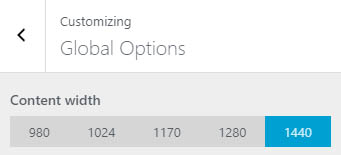
With Envo Blog PRO you can set content width.
To setup the content width go to Customizer – General Options and set “Content Width”
2.6.Lazy load images (PRO)
With Envo Blog PRO you can save bandwidth and drastically improve page loading time and user experience.
Site speed is one of the factors that determine whether you get a good ranking in Google!
Lazy Load Images plugin decreasing page load time by progressive loading of images (Important: Background images are not affected!). They will load just when reach visible part of screen.
There is no plugin setup. Install and activate the PRO plugin. The plugin works automatically.
Note: If your site is cached, clear the cache after the plugin activation please.
3.Header Settings
3.1.Header Top Menu
Configure Top Header Menu
- Go to Appearance >> Menus
- Setup your menu
- Choose the menu location at Top Menu Left and/or Top Menu Right under Menu Settings
- Click on Save Menu Button.
3.2.Header Image
- Go to Dashboard >> Appearance >> Customize >> Header Image.
- Click on Add New Image and add your header image
- Then, click on Save & Publish button.
3.3.Configure site logo/title
- Go to Dashboard >> Appearance >> Customize>> Site Identity.
- Click on Select Logo for upload or change site logo from existing logo.
- Enter Site Title and Tagline.
- Check box option about site title and tagline display.
- Click on Select Image for upload favicon.
- Then, click on Save & Publish button.
4.Advertisement spaces (PRO)
4.1.Ad before content (PRO)
You can put advertisement before post/page content with our Envo Blog PRO plugin
Install and activate the plugin and go to Customizer – Ad spaces – Ad before content
You can use simple text or HTML code. Code example:
<a href="#"><img src="https://envothemes.com/envo-magazine/wp-content/uploads/sites/5/2017/12/728x90-envo-magazine.jpg" alt="" width="728" height="90" /></a>
4.2.Ad after content (PRO)
You can put advertisement after post/page content with our Envo Blog PRO plugin
Install and activate the plugin and go to Customizer – Ad spaces – Ad after content
You can use simple text or HTML code. Code example:
<a href="#"><img src="https://envothemes.com/envo-blog-pro/wp-content/uploads/sites/12/2018/05/banner-728x90.jpg" alt="" width="728" height="90" /></a>
4.3.Ad after main menu (PRO)
You can put advertisement after main menu with our Envo Blog PRO plugin
Install and activate the plugin and go to Customizer – Ad spaces – Ad after main menu
You can use simple text or HTML code. Code example:
<a href="#"><img src="https://envothemes.com/envo-blog-pro/wp-content/uploads/sites/12/2018/05/banner-728x90.jpg" alt="" width="728" height="90" /></a>
4.4.Sliding Post/Page Ad (PRO)
You can put sliding advertisement into post/page with our Envo Blog PRO plugin. This Ad reveals from bottom when you reach end of the content.
Install and activate the plugin and go to Customizer – Ad spaces – Post/Page sliding Ad
You can use simple text or HTML code. Code example:
<a href="#"><img src="https://envothemes.com/envo-blog-pro/wp-content/uploads/sites/12/2018/05/banner-728x90.jpg" alt="" width="728" height="90" /></a>


2.1.1.Social icons in menu #
The theme automatically replaces links to popular social networks with icon equivalents.
Use “Custom link”, add the social page link and set the title. It should look similar to this:
Supported icons: