It’s a common error and it can be easily fixed. This error message is an indication that the file you are trying to upload is larger than your web host allows (WordPress default file upload size is 2 MB).
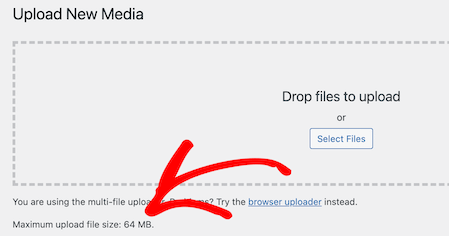
You can quickly check your WordPress upload file limit by going WordPress Admin Dashboard -> Media -> Add New section.
To increase the maximum file upload size in WordPress, you need to make changes to your website’s configuration. Here’s a step-by-step guide to help you:
- Edit the php.ini File:
- Access your website’s hosting account or use FTP to connect to your website’s server.
- Locate the root folder of your WordPress installation, which is typically named “public_html” or “www.”
- Look for the php.ini file in the root folder. If you can’t find it, check if there’s a php.ini file in the wp-admin or wp-includes folder. If you still can’t find it, contact your hosting provider for assistance.
- Open the php.ini file using a text editor.
- Look for the following lines and modify them accordingly:
upload_max_filesize = 64M

post_max_size = 64M

max_execution_time = 300
-
-
You can adjust the values according to your requirements. The values above set the maximum file upload size to 64 megabytes, the maximum post size to 64 megabytes, and the maximum execution time to 300 seconds (5 minutes).
- Save the changes to the php.ini file.
-
- Edit the .htaccess File:
- Using a text editor, open the .htaccess file located in the root folder of your WordPress installation.
- Add the following lines at the bottom of the file:
php_value upload_max_filesize 64M

php_value post_max_size 64M

php_value max_execution_time 300

php_value max_input_time 300
Save the changes to the .htaccess file.
- Edit the functions.php File (Theme-specific method):
- Access your WordPress site’s admin area.
- Go to “Appearance” -> “Theme Editor.”
- On the right-hand side, find and click on “Theme Functions” or “functions.php.”
- Add the following code at the end of the file:
@ini_set( 'upload_max_size' , '64M' );

@ini_set( 'post_max_size', '64M');

@ini_set( 'max_execution_time', '300' );
Save the changes to the functions.php file.
After making these changes, your WordPress website should have an increased maximum file upload size. Keep in mind that some hosting providers may not allow you to modify these settings directly, in which case you should contact your hosting support for assistance or explore alternative solutions such as using a plugin designed for increasing file upload limits.